Sunday, December 28, 2014

Schwarzkopf Ultimate Colour Dark Red Brown


Having dyed brown hair for about 3 years I've been completely sick of seeing it on my hair. After contemplating getting my natural hair colour back for a couple of days Ive also been stuck on changing my hair colour to a red/brown shade. I did major researching on foam hair dyes being sold in Australian stores and came across the Schwarzkopf Ultimate Colour. 
There wasnt much reviews or pictures for this one so I was a tad worried on the colour outcome but considering that red shades do fade I would still be back to brown in the future. 

My usual hair colour/ bleached ends/ w natural ombre
I dont think I've ever tried having red/brown hair so it was an exciting thought to me so I did end up doing the most impulsive thing ever, walking to the shops at about 7/8pm to the nearest Chemist Warehouse just to get the dye . Lucky for me there are 2 nearby across the road from each other and the first CW I went to were sold out of the colour so I did go across to the other CW and got 2 boxes of the Dark Red Brown shade, there was a cherry one which Im tempted to try out next! 

Anyways lazy me did not end up taking pictures of the actual packaging and the dying equipment but to describe it, the product comes out of 2 cans that dispenses from the pump. You pump it into your hand which gives you 2 foamy blobs, white and red which you have to mix and then apply onto your hair, simple. It comes out like a mousse and is super easy to apply, as of most foam hair dyes, you just massage it into your hair like you would with shampoo. But best thing about this dye is the fact that you can use this more than once, so you can save the left over product for your regrowth or future use!


I ended up using one box and a couple of pumps from my second box which is pretty good as I do have medium/long hair. As time goes the foam does disappear and leaves your hair with the typical hair dye feeling aside from having dripping dye. 
I left the dye on for about 30-40 minutes before washing it out and my gosh the water did not run clear for me until the third day which I'm going to assume that it was already fading from each wash (and i do wash my hair everyday). It didnt leave any stains on my pillow case and the countertop and was an easy clean on my skin. 

Freshly washed & dried
4 days later
a week later
It has been 2/3 weeks and my hair has completely faded from the red, it is now a chestnut brown, around 2-3 shades darker from my original brown. I still have a tinge of red near my roots but not that noticeable unless under the sun.
I am bummed out that it faded so quick but thats the only con for using a red dye. They do have a Dark Cherry shade which is apparently a dark purple that Im eyeing for the future.
This dye may not suit everyones cup of tea as I dont think it would come up on darker hair, I do have noticable regrowth on the inner parts of my hair (neck area) as most of my horrendous hair dying always missed that part and I found with this dye it didnt do a fantastic job in that area. But aside from that I will be using this dye in the future as it did not damage my hair whatsoever, its still the usual and didnt feel dry after dying it and using the conditioner/hair treatment that it came with.
Ill probably be dying my hair once again next week and see if it will darken my hair!


Saturday, December 20, 2014

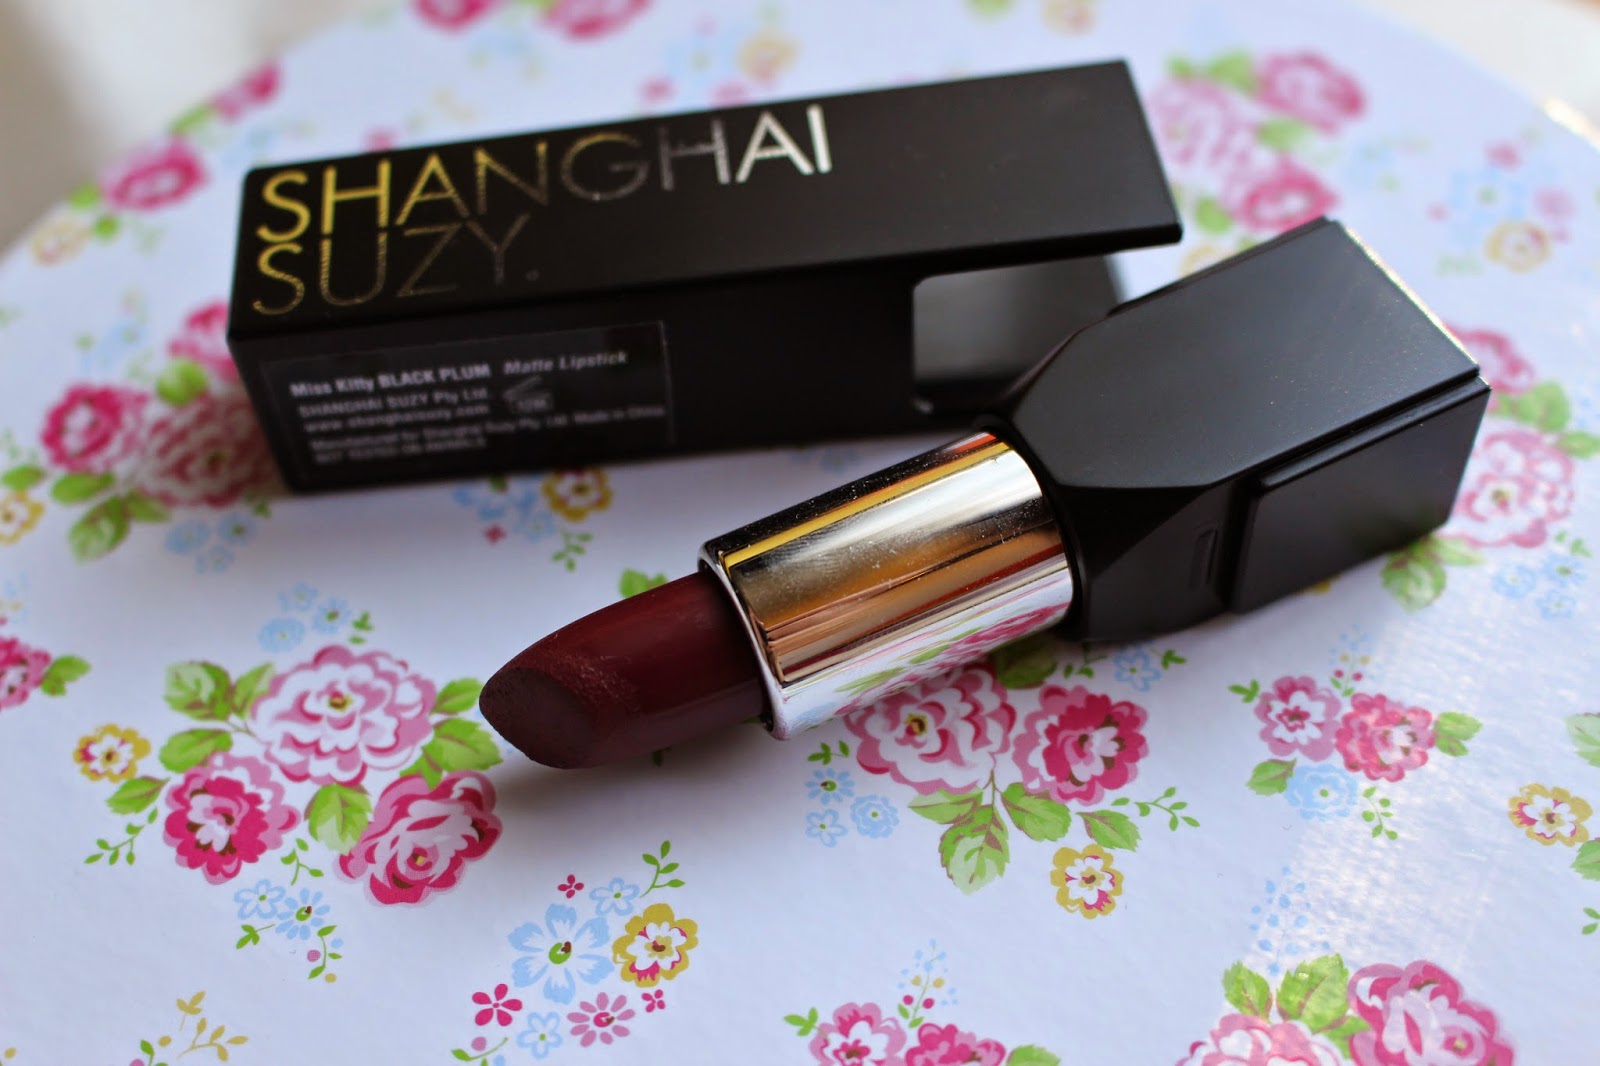
Shanghai Suzy Miss Kitty || LOTD


Probably one of the most underrated lipstick brands out their would be Shanghai Suzy, it just does not get enough attention in the beauty community!! 
Although the lasting power is pretty standard for me the colours of each seasonal shade makes me drool over them.
I bought the Miss Kitty hoping to get into berry lipstick colours during the winter time but I never got around to using it as the shade didnt make me want to bother with making sure my lips were fully smooth and also how much of a change from using brighter lipstick colours would be.
Hiding in my lipstick drawer, I though why not just use it again even though it may not be "summer appropriate"


Recently it has been my go-to shade just for a pop-in to the shops, doing my late Christmas shopping and grocery runs I've somehow been confortable in wearing it out which I am proud to say. 
I actually have it on my lips right now and the colour is just too gorgeous for me to not use it.
I am quite the lazy person so I dont really bother with a lip liner to outline the lips or to use a lipbrush for a better application so I do apply straight from the bullet and it is somewhat of a hit an miss in terms of getting a dark lip shade looking perfect. Yesterdays application took quite awhile as the edges I had to keep redoing but today I got it looking decent with no fuss. But that's what you get with darker lip shades but in the end it's worth it.

After this swatch, I accidentally smudged it on my white doona and will not come off guys :(

Being a matte dark berry-pink lippy, I do need to exfoliate my lips before applying it as it will cling onto dry spots and wont look as smooth. 
The lipstick goes on somewhat smoothly and does not dry the lipsticks which is the best part!
I find from eating+drinking it will leave the dreaded lipliner look from the lipstick fading on the inside so I only ever use this lipstick when Im going out to the shops by myself, it will be a high maintenance lipstick if you are out eating as reapplication will be needed.
Other than that, it doesnt bleed or smudge (as long as you dont touch the lips) and did me well with a good 1-2 hour shop in the heat.

Disclaimer: I purchased this lipstick with my own money!

Wednesday, December 17, 2014

Viva La Juicy


I have never been one to buy perfume in a smaller size, Im usually the one that buys the full sized perfume, I mean you either go big or go home!
Though before my dad left to go overseas, its usually a thing to go to Mychemist and buy the perfumes that are always on sale and he let me choose a perfume as a nice gift for myself. Not many of them stood out to me and I thought why not try the Viva La Juicy, marked down from $60 to I think it was $20-$30, I did get a whiff of it in stores and it won me over.


 Viva La Juicy is known for its hot pink bow, appearing in quite a few beauty bloggers vanity or makeup table as it does stand out. Im a sucker for packaging and I just love how the bow just pops out from my perfume collection. Even the crystal top makes it feel so much more classy!
The bottle is a 30ml and fits perfectly in the palm of my hands, would also be a great size to fit in your handbag.


From the first smell, it really reminded me of Katy Perry's Meow mixed in with Britney Spears Fantasy and my gosh it is a lovely combination. I found with Meow that it was too night time-ish for me and for Fantasy that was way too sweet for my liking and mixed together Viva La Juicy is my current perfume favourite! (but Im not trying to say it is the exact perfume combo, just reminds me of a mixture of both)
The scent is on the sweet side but it isnt sickly/overly sweet which I love about it, it reminds me a bit of caramel with a hint of floral which is you are a fan of these scents you may want to check this one out!
The scent lasts a good 6 hours until it becomes a subtle scent, it is very wearable for daily use and I have been picking this up quite a lot for everyday wear and I have not been sick of it yet.

What are your thoughts on Viva La Juicy?


Sunday, December 14, 2014

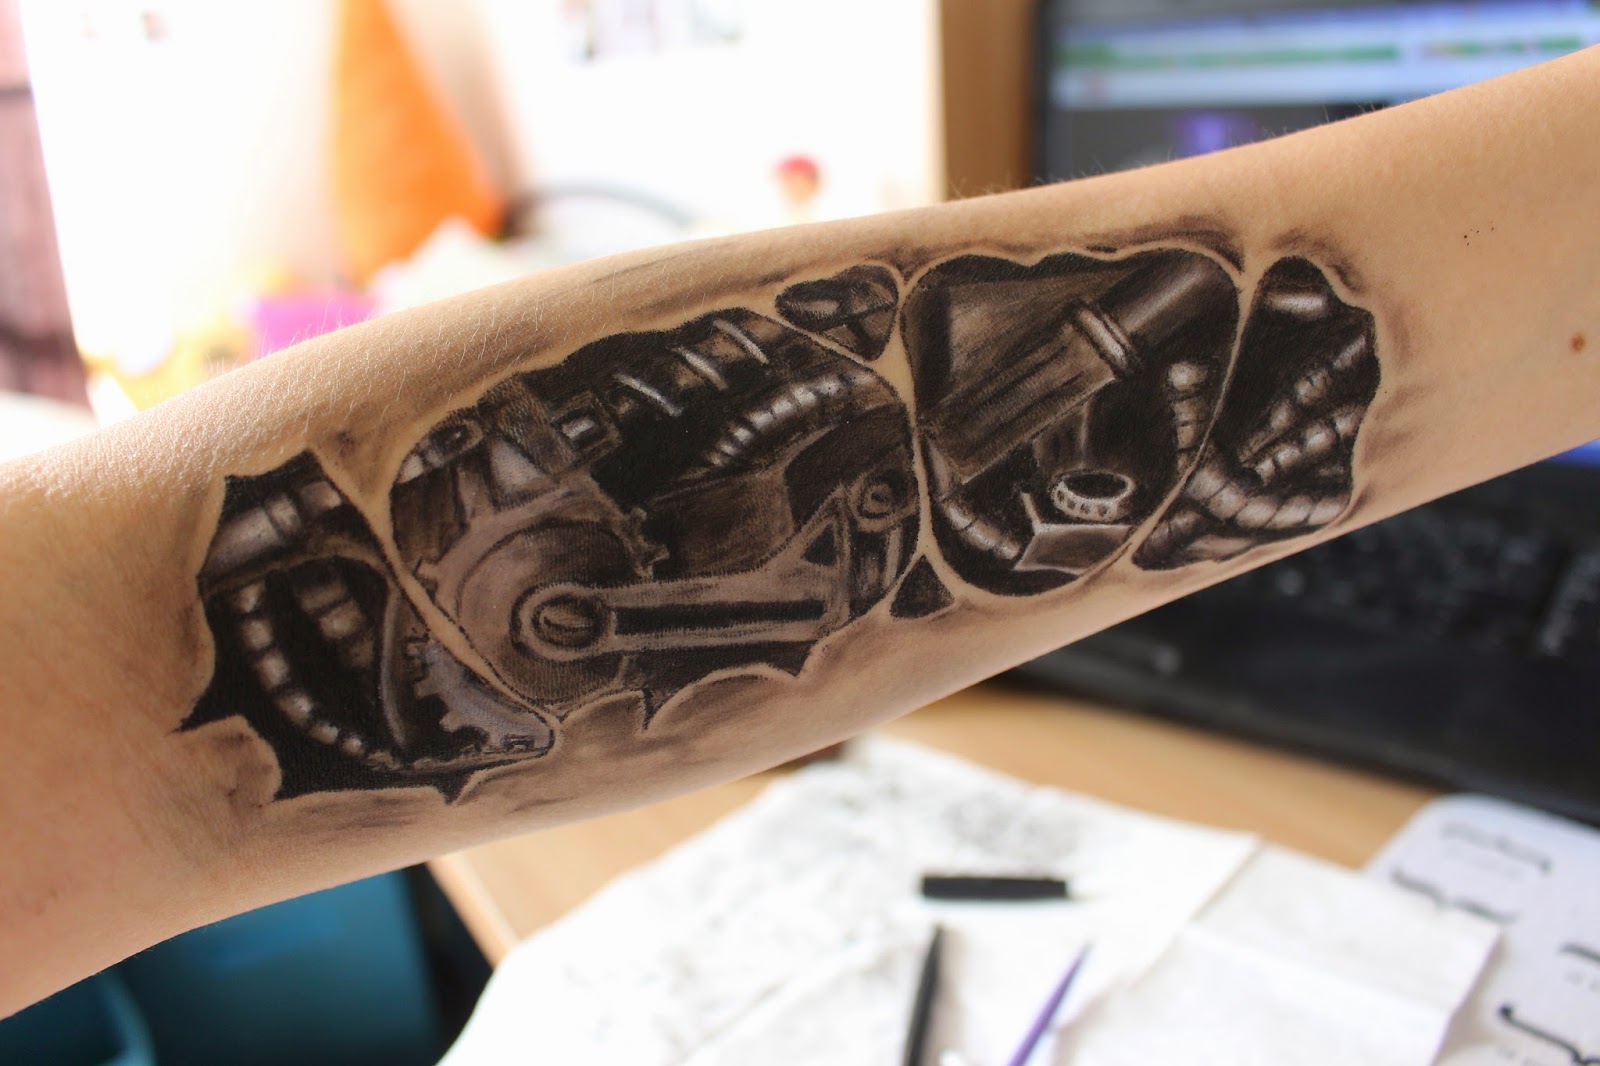
Mechanical Arm Makeup


The reason why special effects makeup intrigues me is how you can use makeup to create something unreal. After watching so many youtube videos of transformations of movie characters and Halloween creations it just looks so awesome, from the before and after aspects!
I've recently been drawing on my hand/arm copying henna prints and I thought why not try the robot/mechanical arm makeup Ive seen a couple of people do.


There are so many creations of the robot arm, and I wanted something not too intensely detailed or too simple, so I did find this picture of a mechanical tattoo and I thought it wouldnt be too hard to copy the cogs and pipes and the tone wasnt too scary. And come on, Im not creative enough to think of my own design!


First starting off, I used a white eyeliner pencil to sketch the main shapes then went on to the detailed parts. I started with white since it was a lot easier to fix up if I messed up and also drawing on top of it with black liner makes it a great template!


Next I used my MAC Fluidline and RT Silicone Liner brush to outline everything and then I got into shading and tonal work.
The white reflective parts were from the white eyeliner pencil which I made sure to colour in wherever the white would show in the reference picture.
I did have a tissue with me since the brushes I was using required me to wipe off the excess liner!
I started from the right working towards the left.
I did have trouble toning the cogs which you can see the crappy blending and off colour, whoops D:
The gel liner literally dried on the skin so quickly so I pretty much had 5 seconds to blend before it was set. 


The last thing I did was putting in some extra details by the edges to make it look like it was apart of my arm, but lets face it, it doesnt really look like that, it just makes it look better imo!
But I started off using gel liner, but the blending was frustrating me so I was using a cotton bud to quickly blend it and also added some black eyeshadow with a blending brush to darken it up a bit.

Products/Tools Used:
-Missha White Eyeliner Pencil
-MAC Blacktrack Fluidline 
-Essence Black Eyeshadow
-Real Techniques Silicone Liner Brush
-Maybelline Gel Liner Brush
-Sigma Tapered Blending E40
-Cotton Buds

 The entire thing took me 3 hours to do, very very time consuming but I was watching youtube videos and New Girl as I have to multitask whenever im doing anything especially watching videos.
Will probably trying something similar again as it is quite a fun thing to do for me so if you guys have any suggestions in what I could do next that would be good! 

Thursday, December 11, 2014

Beauty Swapbox with Wengiful!


Awhile back, my awesome blogger friend Weng from Wengiful and I decided to do a swapbox!
We concluded that we would spend a maximum of $40 on the goodies to send to each other.
It was a tough decision on choosing the items to send to each other but in the end I did choose items which thankfully she didnt have, so you can see what I sent her [here]


I pretty much died on the inside, when I opened up the parcel, kind of like opening a Christmas present and seeing a variety of gifts, it just gets you excited :') 
Anyways I did receive this parcel before my exam time so it was a great pick-me-up before the dreaded exams.


Obviously the first thing I saw was this Skin79 BB Miniature Set as it was the biggest out of the products. Perfect time to get this set though as I will be going overseas early next year and I will be trying to pack light in terms of makeup! I do have the full sized version of the Hot Pink one and I have been itching to try the other versions so lucky for me!


Next one I picked up was the Physicians Formula Shimmer Strips Palette. Although I told Weng that Im not a huge fan of shimmery products, I think it was a smart to include a product that you personally like! I love the concept of the All-in-1, as you can use this as multiple things if one doesnt work out for you. I am a huge fan of highlighting so I know I will be using this one a lot next year when the formals and 18th birthday parties start! 


The two Hello Kitty products were the reason why we started the swapbox as it was available where Weng was and she was nice enough to get them for me!
As I my main makeup product is eyeliner, she got me the Hello Kitty Eyeliner which will be exciting to try since I still am looking for my hg eyeliner or even a decent one for daily use. I wont be testing it out yet until I finish my current liquid liners! 
The second one was the Hello Kitty Lip Balm! I love trying out different lip balms and lets face it, you can never have enough lip balms! The scent reminds me of the Crabtree and Evelyn Rosewater hand cream and I find that it soaks in the lips hydrating it quite well so it doesnt feel like a layer of lip balm doing nothing. 
Leaving the best till last, the Tony Moly Easy Touch Auto Eyebrow Pencil made me jump on the inside. Im nearly out of my current hg eyebrow pencil (Etude House) and Ive been wanting to try out other Korean eyebrow pencils. Cannot wait till I start using this!!


Thanks so much Weng for the swapbox!! Will definitely be up to doing it again in the future :)


Monday, December 1, 2014

November Favourites

The colour is tad bit off due to the lighting!
Just so you know, this is going to be a super short monthly favourites as I didnt have much new favourites to include. Some of these products wouldve made it in the October favourites but I actually didnt do a monthly favourites then so they have appeared here!


Puretopia Facial Mist & Toner*
As the heat pops in, all my facial mists come in. I did a review on this one and I love how refreshing it is! The smell is quite citrusy which I love as gets me into the summer spirit. My faovurite thing to do is spray this on my face as i have a fan blowing on my face, will be using this throughout the summer!
Review [Here]

Dove Invisible Dry Deodorant 
For all my life I have no idea how I never used an anti-perspirant stick. This one was on sale at Woolies and my gosh has it made a difference, I still do sweat through this but it doesnt give me the dreaded sweat stain while wearing a plain tee (tmi yes I know). 

Rimmel Scandaleyes Waterproof Pencil Liner in Purple
Im sure we are all aware how much I love this purple liner, Ive done a review on this one so I wont go into details but favourite pencil liner to use when Im out and about, love the colour!!
Review [Here]


Lady Jayne Tangleze 
I won this from a giveaway by Twoplicates which I am so glad I won as I was needing a new hair brush. I was on the verge of purchasing the Tangleteaser but I didnt know if it was worth the price or not. But safe to say that the Tangleze does the job way better than an ordinary hair brush. I would say it works well for fine hair but there are some occasions that it will pull on a knot, though in the end it will untangle it. 

Oaty Slices in Raspberry & White Chocolate
Im just going to start off by saying these are the best things you will ever have. Ive gotten a few of my friends addicted to these as Ive been eating it as a snack at home and for all my recess snacks. You can usually get these for $2 for a box of 6 at Coles and Woolies during a sale and I recommending buying these in bulk as I could pretty much eat a ton of these at a time. There are other flavours but the Raspberry & White Choc is my favourite also the Orange Chocolate! 

Canon 700D (Not pictured)
As a late birthday present my dad got me the Canon 700D, I did pitch in some money for this while my dad paid the rest as it is pricey. But trust me it is well worth it, I have always been down about my picture quality as the focus of my previous camera drove me insane but the 700D became my bestfriend from the first use. I have been blogging since 2012 and I told myself not to get a DSLR as I didnt know whether I would be blogging in the long term but I know Ill be using this during holidays and overseas trips aswell as blogging! 

Disclaimer: Products marked with a * was sent to me for consideration, everything else was purchased by me aside from the Tangleze.

Friday, November 28, 2014

Wonderstripes*


Im sure most of us have heard about double eyelid tape, especially in the Asian region where double eyelids are considered a good thing in the beauty world. Bigger eyes, and also a visible crease line. It is quite a hard product to grab especially in Australia unless you do live close to an Asian beauty store or even a Daiso. Which is probably a reason why it isnt a well known product, I mean most caucasion people have double eyelids, whats the point of getting one?! Well little did I know there is a product out there, which is very similar (probably identical) that helps lift the drooping and hooded eyelids to give a youthful look.


Before I go on, it would be best to watch this video [here] just to get the jist of how these are applied and also the before and after results, which I personally think is the best part!
Wonderstripes is targeted towards people who do have droopy/hooded eyelids and I can say that it would work wonders for people who have bigger eyes but I on the other hand have small hooded asian eyes and using the Wonderstripes did not suit me whatsoever but it did work to change my eyelid shape which would be handy when playing around with different eye looks and transformations!


They retail at $27 each and do come in two different sizes, small and medium and they also come in 2 sheets with 64 pieces altogether. Which lasts for a month if you are using this daily.
What I find surprising is how sturdy these tapes are, I mean I always think of eyelid tapes as thin stickers that would not last but the Wonderstripes are legit, they smooth onto your lids and when they are on your lids, they are on your lids until you remove them!
I know I wont be having much use out of these as I would like to but I do want to share a tip in which using the Wonderstripes may help you with. 
Uneven eyelids, I used to suffer from having a triple crease in one lid and a normal double eyelid on the other and how I fixed them was by using double eyelid glue, and if you havent figured already, eyelid tape is pretty much the same thing. Michelle Phan did do a video a few years ago on uneven lids which is how I figured out the trick. 
I still do suffer from waking up with a triple eyelid once or twice a year and I know it would be the one occasion in using the Wonderstripes to fix it. 


Honestly I am stoked that eyelid tape is starting to drift into the rest of the world. You would think that it would only be used for monolids but it works well for the double lidded people out there!
You can see above that it has made my eyes bigger just from making my lids more visible but the downside is that the tape did peek through which apparently isnt supposed to happen unless you apply it right but lets face it, my lids are small, it will be visible.
If you arent exactly used to eyelid tape or it is your first time using it, it's an odd feeling but I like to think that it literally lifts the eyes!
Definitely recommend to people looking for an alternative to eyelid surgery!

Wonderstripes

Disclaimer: I was sent this for reviewing purposes, as always it is my honest review!

Saturday, November 22, 2014

Morning Frizz || My top 3 tricks


Before I did my ends ombre last year, you could say that I had hair that I wish I had now. Before using the boxed hair dye that I forever regret using (talking about you Loreal Feria Ombre), I never experienced frizzy ends. I rarely woke up with tangled hair, a birds nest in my hair I never even bothered to touch my hair brush because I didnt have to use it. 
Now I've come to the conclusion I wont be able to get that hair back until I cut my hair short. And for those who dont read my tweets, I do want to get  short hair sometime soon. Get my natural hair colour back and start afresh but until then, I have came up with my top 3 tricks that make my hair somewhat manageable when I wake up in the morning.


1. Braid your hair before you sleep

This is one that I swear by! Braiding your hair before you sleep. There are two ways you can do it, dry or wet and yes they both do different things on what you want the next morning.
For those days where you want a fancy wavy hairstyle and less frizzy ends, I recommend you braid your hair while its damp and let it dry through the day/night and make sure you sleep with it dry. You can definitely just braid it while its dry but the waves may be less dominant. Also sleeping with it dry, you may end up folding your hair while you sleep (depending on how you sleep & where the braid is at). I personally like to do a side braid or sometimes pigtail braids.
As for the wet braid, the method behind this is: washing your hair 1-2 hours before you sleep and braid it while its damp and sleep with it while its damp, you will wake up with wet hair still but when you take the braid out your hair will be back to your normal hair, no wavy hairstyle, just like you washed it in the morning. 
This trick works for me well but experiment with this and you're bound to find the right way to do it if these dont work for you!


2. Use a hair treatment/conditioner

This is an obvious one, use a hair treatment, whether its a hair mask, hair oil or just a plain old hair conditioner, use it!!
The ones Im using at the moment are the MorocconOil Treatment and the Tresemme Keretin Smooth Hair Conditioner!
I do wash my hair everyday (yes Im aware its not good for my roots) and I use whatever shampoo there is in the bathroom but I purchase my own conditioner. I have been on the lookout for a good conditioner and this one has been my favourite out of the bunch. It states that it controls frizz for up to 48 hours which I personally think is not true, if I sleep with my hair not in a braid I will wake up with the ultimate frizzy hair so no it does not help in that way. But it is honestly great to use in the morning, keeps my ends super smooth and untangled through the day!
As for the Moroccan Oil, I wouldnt say its amazing but it does tame my frizzy ends if I end up having some in the morning. I love the scent of it and doesnt leave my ends looking oily.

3. Trim those ends!!

Last but not least, trim your hair. The only way to get rid of your frizz is to chop it from where it starts which for me is from my collar bones but until the day I go to the hairdressers and get it short, I just trim atleast an inch off. I did do it myself and yes it has made my hair so much more manageable, so ive dedicated myself to trim my hair atleast one a month until I see a huge improvement of my frizz gone! And if youre wondering, I use a hair razor to trim my ends.

What are your top morning frizz tips?

Tuesday, November 18, 2014

The Purple Phase || Rimmel ScandalEyes Pencil Liner


For the longest time, I've always wanted to try out purple liner. Black was always my go-to colour, brown was average to me and other colours really didnt stand out. Well finally I purchased the Rimmel ScandalEyes Waterproof Kohl Kajal on Asos while it was on sale but you can pick this up at Priceline or Mychemist when the 50% Rimmel products are on.
I've been wearing this colour non-stop after receiving it in the mail and I am in love! 


I was hesitant in purchasing the one from Rimmel as pencil eyeliners do not last on me but I know for a fact that the darker the pencil liner, the more it will be noticable when smudged and with colours like purple, it may smudge on you but it wont give you a panda eye look compared with the black. So I bit the bullet and got the purple just knowing that this wont be the HG pencil liner that lasts all day, which of course isnt, but rather what got me loving this liner was the colour!


You could say that this is somewhat comparable to Urban Decays 24/7 Pencil Liner but I would say it's less creamier. I mean it is definitely creamy and pigmented, but I found it harder to apply when I applied eye primer underneath as it did start to tug on my lids after. 
The nib of the pencil does wear out fast so I did have to sharpen it after 2 days of use and since I do wing out my liner, pencil is pretty much the worst when it comes to getting a fine line, so with the use of a q-tip I pull the liner out and smudge the edges and it looks fine...from afar. But that is one of the downsides for using any pencil liners.


What I love about using purple liner is that you can get away with lining your eyes, applying some mascara and you're good to go for the day. It doesn't have the intensity that a black eyeliner would have but it does have the ability to show your natural eye shape instead of changing it. 
I have used this eyeliner, at work, school and for whenever I've been out and the lasting ability has been tested. 
Without primer, work for 3.3 hours: Slight smudging, eyeliner separating from the ends as a result of watery eyes (pictured at the bottom right)
With primer, at school for 4 hours, out for 1 hour: slightly noticable smudge near lower lashline, majority of the purple liner has faded/smudged away from the lashline also separation of product at the ends of my eye also from a result of watery eyes.
So the results is typical for me but Im just glad it doesnt give me raccoon eyes at the end of the day. 
I would label this pencil liner a favourite of mine due to the colour and texture but when it comes down to the lasting power, the smudging and fading on the lower lashline is frustrating.
But anywho I have been getting many compliments on this liner at school and does go to show purple liner is super pretty, so do try getting your hands on a purple liner if you dont already!!

Saturday, November 15, 2014

Maskd*


After experiencing the Mint Julep Masque by Queen Helene, I think my love for facial masks have grown. I've always been the one to use Asian sheet masks as I find them so hydrating and such a relaxing task to do after a stressful skin week!
But I do have a place in my heart for facial masks as they do make you feel like youre having a pamper session and they do make a great activity with the girls.
I was lucky enough to be send some samples of a new Mask that will be coming in Australian salons soon and wow has it made my skin hella smooth.


What won me over was an inpiring story behind the founder Carlie and the creation of Maskd which you can read [here]. 
The mask states that it will help with the following:

 Smooths lines and wrinkles

 Sooths damaged skin & reduces scarring
 Permits fresh, glowing skin
 Allows natural oil flow
 Moistens dry skin
 Covers blemishes
 Improve application of make-up


A little spoiler alert, I would say that yeah the claims are 70% true, I mean I've only tested it for 4 days and havent experience 'smooth lines and wrinkles' or 'reduced scarring'. It may be a product that could help if you use the Mask in the long run, but other than that Im quite happy with the other claims actually working. But I will say that no matter what skin type you have, it will cater to your needs.
Also the mask does not contain any of them nasty chemicals that's usually found in a lot of masks.


First things first, I know the full sized product is a squeeze tube so yes it wouldve been a lot neater than using the satchels but the sample sized product was obviously a mess and although the plastic satchel was visually appealing for me, it was hard to rip open so I was using scissors most of the time.  Now there are 4 easy steps in applying this bad boy.

1: Cleansing your face and drying your skin (it does state to cleanse twice but as long as your face is squeaky clean, im sure it would be the same)
2: Apply a thin layer of The Green Mask to your skin, avoiding your eyes and mouth.
3: Leave the mask on for 10-15 minutes while the active ingredients begin to work their magic on your skin. You will experience the 'sting" (but more on that later).
4: Using water and a clean washer, remove the mask.


Note: I tested the mask for 4 days in a row

During the time I left the mask on my face, 3 minutes in the "sting" hits. For the first two days the sting was a burning sensation which made my eyes tear, it stung like a bee. But the last two days was just a nice tingling sensation which was a nice refreshing feeling. 
I read up on the sting and it did state that the stinging effect will vary from person to person as we all have different PH skin levels and also the more you use the mask the less discomfort you will experience. 

Compared with my experience with the Mint Julep Masque, Maskd does not dry to tell you when its done, it will stay movable so that was one of the cons for me as I prefer facial masks to dry.
Also the last con was somewhat of a pro/con for me. The scent reminded me of my childhood, which was a pro but the scent was like a playdoh/Plasticine scent/children paint could not wrap my nose around the scent but it was definitely something that reminded me of being back in the art room.

Testing the mask for 4 days in a row may sound daunting but it did not dry my skin out! It was more moisturizing rather than drying surprisingly. 
My skin is combination/oily skin and when I washed this off as my room was sweltering in heat, it felt like I applied a thick face moisturizer, but did not make my face any more oilier than it was which was good.
I am lucky to say that I dont really suffer from any skin problems aside from the casual pimples but it was a coincident that I had a growing pimple while testing this product and yes Maskd did reduce that pimple after 2 days use which is why I give it a big thumbs up! I assume from the ingredients that it was because of the salicylic acid.


I would definitely recommend this one for people who have dry,acne prone,combination skin as I feel you will get loads more benefit compared with oily skinned but such a lovely product to use for the colder months aswell!
This product does cost $49.95 for 50ml which I know is such a big price tag, but considering the benefits that you may be looking for, it could be something worth while to save up for as a little pick-me-up or something to pamper yourself with.

Maskd
Twitter: #GetMaskd